Doing some more weathering on the robot. Got it looking pretty good in the skirt/foot area so far:
Also doing a little metal drybrushing to reveal the "metal" underneath (okay, wood, but shhh...!)
Even did some test brushing on my old proton pack. Really adds something to it, I think.
Wednesday, October 21, 2015
Thursday, October 15, 2015
mud, blood, and crud
Playing with some acrylic washes now, experimenting with different shades and thicknesses of red, brown, and gray. You can see some light stuff in the washes here, and also some bis where I caked it on relatively heavy.
(Note the "corrosion" in the joints of the power coupler on the right, the brown streaks. And also the accumulated dirt in the coin return on the left.)
(Note the "corrosion" in the joints of the power coupler on the right, the brown streaks. And also the accumulated dirt in the coin return on the left.)
Wednesday, October 14, 2015
More weathering
So I'm using the back maintenance hatch as a sort of "guinea pig" for my weathering efforts. Tonight I'm experimenting with color washes, dilute paint solutions that are dabbed on and then wiped way with a damp paper towel. Going for a subtle effect, just making it look like it's been around a bit, you might say.
Tuesday, October 13, 2015
R2 Part II: the adventure continues
So what does one do once one has a nice, shiny new R2? One commences dirtying it up, that's what one does. I'm experimenting with different techniques on the internet. First, a bit of rust paint leftover from some previous weathering attempts, just gunked on to look like a nasty corrosive spot:
Sunday, October 11, 2015
I did it.
OK, so the bracket from yesterday didn't quite work, as the angle made it push the shell up at an awkward angle, so I fabbed up a new bracket, with the ankle mount hold up higher. This gives it a bit more wiggle room, so to speak.
Anyway, once that was on, there was nothing left but to put the side panels on (gorilla tape, just in case I need to take 'em off again), and that was it:
Woo-hoo! Got it. Very pleased, can't wait to show it off. One week shy of ten months, start to finish. Lookin' good.
Actually, lookin' a little too good... (ominous foreshadowing)
Anyway, once that was on, there was nothing left but to put the side panels on (gorilla tape, just in case I need to take 'em off again), and that was it:
(cue Star Wars music)
Woo-hoo! Got it. Very pleased, can't wait to show it off. One week shy of ten months, start to finish. Lookin' good.
Actually, lookin' a little too good... (ominous foreshadowing)
Saturday, October 10, 2015
Center foot redux
OK, remember when I "sewed" the temp foot drive on the center foot with wire? Yeah, that sucked. It's too loose and has a tendency to fall backwards if I try to reverse, plus it's tiled at a bad angle. So instead I'm going to do it a bracket just like the other feet.
Note the "damage" on the flat part closest to the camera. That's actually intentional; the bolts on the front wheel mount are kind of close quarters, so I had to notch this section out so that the bracket would lay flat against it.
Note the "damage" on the flat part closest to the camera. That's actually intentional; the bolts on the front wheel mount are kind of close quarters, so I had to notch this section out so that the bracket would lay flat against it.
Friday, October 9, 2015
Getting ready to mount right foot
OK, so I didn't have a picture of my mounting the drive to the bracket before, so here you can see how it looks on the right foot. It's a little crooked, but it slips on OK, so it's all good:
Of course, I can't attach the drive to the bracket until the bracket & foot shell are all done getting mounted to the ankle bracket, so we'll do that first:
Of course, I can't attach the drive to the bracket until the bracket & foot shell are all done getting mounted to the ankle bracket, so we'll do that first:
Wednesday, October 7, 2015
Right foot staging...
Got the right foot assembled, and ready for installation:
BTW, the hose is just regular copper braiding that has been "filled in" with vinyl tubing to give it bulk. I also taped down the ends and glued 'em into the receptacles on the battery box but they're friction-mounted on the foot shell side, in case I need to disassemble them for whatever reason.
BTW, the hose is just regular copper braiding that has been "filled in" with vinyl tubing to give it bulk. I also taped down the ends and glued 'em into the receptacles on the battery box but they're friction-mounted on the foot shell side, in case I need to disassemble them for whatever reason.
Tuesday, October 6, 2015
Left foot complete
Once I was satisfied the bracket would work, I went ahead & drilled some holes going through the bracket into the motor drives. I then lock-tited some bolts sticking up through the holes in the drive so I could lower the bracket down onto them and secure them with lock nuts. It came together quite nicely:
(notice also I got the foot hoses attached, yay :)
Here you can see the complete left leg assembly (except the side panel, which I'll attach last) and the right leg, still using the temp wooden bracket. Getting close.
Monday, October 5, 2015
Rear foot shell mount test
So I took the metal bracket I made the other night home and bolted it to the ankle with the foot shell inside. As you can see, it fits nicely, and I was able to get the bolt threaded in and everything. I do believe this will do the trick.
Saturday, October 3, 2015
Rear foot-shell mounts
After talking to some local club members, I decided to mount the foot shells using some angled aluminum cut to shape. It's basically a 3' long bit of aluminum bent into an L with 1-1/2" length for each "leg". So, I got some at the Home Depot, and went to Hammerspace to commence cutting & drilling:
First I cut to size and trimmed at a 45-degree angle so it would fit within the shell:
Then I took it home and marked a pilot hole for where the bolt goes through the ankle:
And then I took it back and drilled that through:
This should hold the drive very securely to the ankle, but still provide enough room for me to work in the securing bolts, knock wood.
Monday, September 28, 2015
Foot shell time
OK, set myself the new goal of being done by Halloween. At this point ,that basically means the foot shells, but that's going to be a pain because I can't get them mounted properly.
Experimenting with the front one now, thinking I might just use the temp wooden one I got for rolling around with pre-shell, but I can't work a bolt up into the hole because the shell is in the way. So for now, I'm taking some wire and "sewing" it in, thus:
It works OK for now; we'll see if it's a viable long-term solution (spoiler alert: nope, it wasn't).
Sunday, August 9, 2015
Kansas City Comic Con 2015
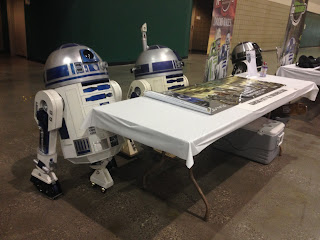
So this year marks the first annual KCCC over at the convention center where PCC usually is as well. It's smaller, being the first, but that meant lots of wide-open spaces to pilot our droids around. That worked out great. Plus they let us drive in to the venue for load-in.
All set up for showtime
Some nice shots with the front skin finally on
Lookin' good
Detail of the load-in. The calm before the storm.
Test drive. Going much better since I tightened the ankles.
Monday, July 27, 2015
Prepping front skins
So I'm doen painting the front skins and gluing the greeblies and such onto them. Time to bond the inner and outer skins and the individual panels.
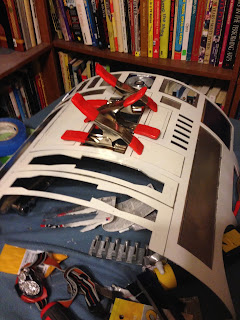
The technique? Clamps. Lots and lots of clamps.
The technique? Clamps. Lots and lots of clamps.
Saturday, July 25, 2015
Rear skins OK
Got the inner & outer rear skins mounted today. Wound up drilling little holes in the corners and mounting using the skin mount blocks from Commando 8. Unfortunately can't do the front ones just yet due to breaking off a screw in one of the front mounts. Replacement on the way.
Also you'll notice the maintenance hatch isn't curved enough. Can't figure out how to fix that without popping everything off. All the bits & pieces are glued on with E-6000. Looks like it'll work.
Also you'll notice the maintenance hatch isn't curved enough. Can't figure out how to fix that without popping everything off. All the bits & pieces are glued on with E-6000. Looks like it'll work.
Thursday, July 23, 2015
A little more skin paint
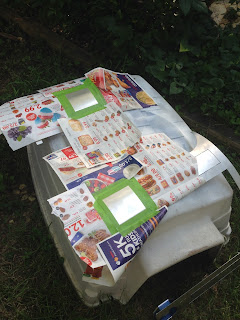
So I said before I was going to leave the inner skins unpainted. Well, that's not 100% true; you know those grill kinda things in the front and back of R2 with the blue behidn them? Yeah, I'm gonna paint in the blue. Just a question of masking:
Tuesday, July 14, 2015
Skirt
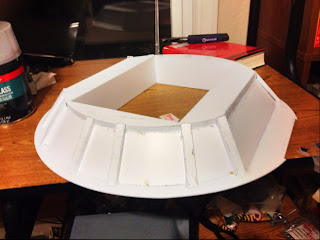
So I got an A&A flat-pack skirt. It's basically sheet styrene that's been cut and you glue it together. I wish I'd taken more in-progress photos, but you can see the end result here:
It's pretty light and flimsy, and definitely not load-bearing, but it looks good, and should be great once I put it on and weather it a bit.
It's pretty light and flimsy, and definitely not load-bearing, but it looks good, and should be great once I put it on and weather it a bit.
Sunday, June 28, 2015
Maker Faire 2015
OK, so got to show off R2 so far again this weekend. It's the first time I've had 'em rolling around in public. Got some serious control issues, mind; it seems the rear wheels aren't tight enough to the ankles, so there's a little too much "play", making the steering unreliable. Still, I had a good time and talked to a lot of folks.
R2 on the way to the Faire
Note the clear plastic "skin" I put on so people could see R2's innards. I figured it made sense, Maker Faire and all.
Dig it: a 3-D printer big enough to print furniture.
Note to self: get one of these for R2.
The gang all parked together at the end of the day
Hey, look who else is here!
Our droids lined up Sunday. You can see the clear skin better.
And of course it wouldn't be an R2 gathering without a big of on-the-spot maintenance.
It was pretty cool. Nice to see everyone and the progress being made with the different droids. Looking forward to KC Comic Con.
Wednesday, May 27, 2015
Battery boxes for the feet
So I've got the PVC battery boxes for the feet, and commenced to work on getting them ready. I had the cutout points marked on the foot shells, so I transferred 'em to the battery boxes and got 'em opened up, thus:
Also, check out what was parked at the hair place next to the hackerspace: a Tesla!
Couple bolt holes going through, and I can fasten them on. Tada:
(one for me too, please)
Monday, May 25, 2015
Skin prep
So started work on getting the skins all ready. First, I (on the advice of previous builders) went through and labeled all the detachable panels and such, numbering them so I could get them back together properly later:
Next up, I punched out all the bits that needed punching-out (you'll see that I left some panels in, at first, but did eventually fully remove all of them so I could clean off the "tabs")
Now it's time to start painting. I've been going back and forth on this, but decided to just paint the outside and leave the inner skins metal. Should be a nice look for 'em.
Subscribe to:
Comments (Atom)


