Showing posts with label legs. Show all posts

Tuesday, April 28, 2015

On my own foot-like appendages

Well, the new plate for the center ankle arrived yesterday, so I was able to bolt the center leg on. It took a little trial-and-error as the ankle was rather too long, but after a couple of trips to the maker space I managed to get it just right.


Test mounting. It works, but the ankle is still a little too long.


Ah, much better. The plate is mounted with spacers and bolted to the frame. That oughta hold 'er.

Anyway, the upshot is that I can finally dispense with the box support, and let R2 support himself, thus:


Right on.

Also, it looks like my foot shells will be coming in the mail tomorrow, so I get to start working on mounting those up and making them all gussied up properly and all that jazz. Also gotta get some craft foam to put on the center ankle plate to boost up the batteries so they'll be secure in their holes. Get that done, make sure the motor drives scoot around properly, and all that's left is the skirt and skin. Cruisin' along like nobody's business.

Tuesday, April 14, 2015

We have legs. (And we know how to use them.)

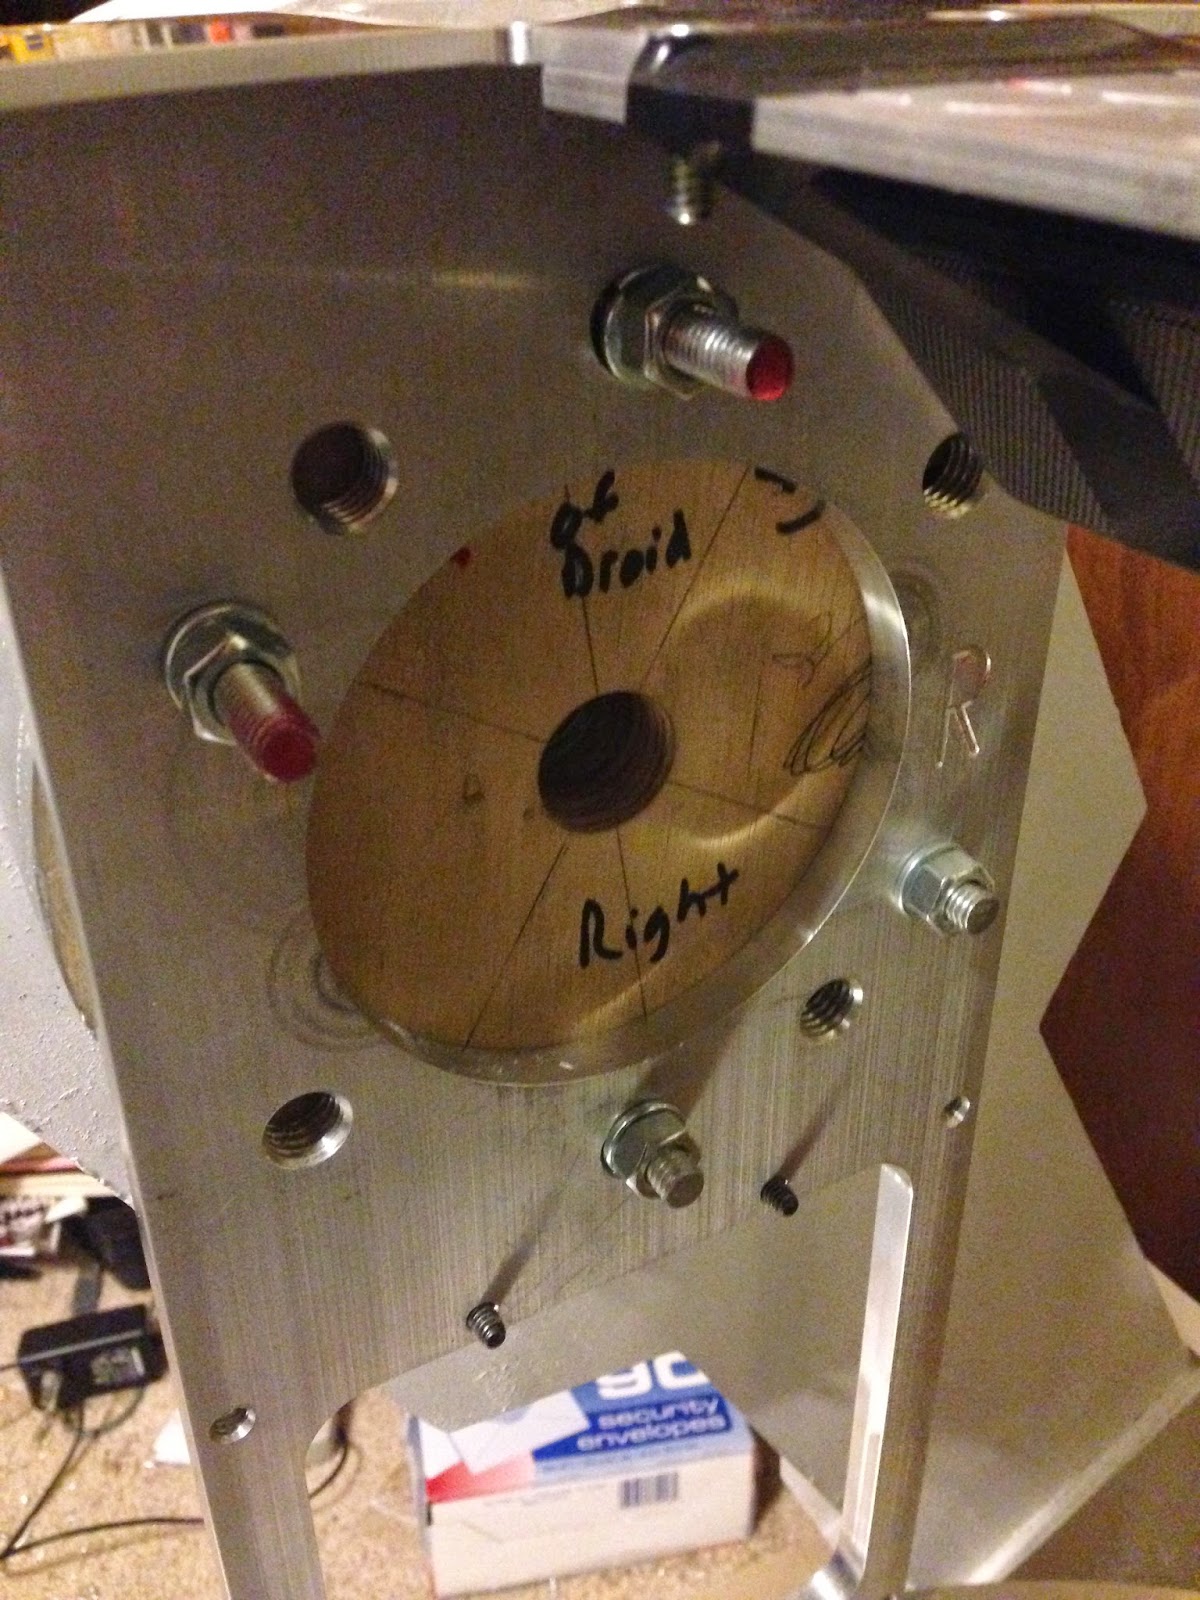
So last night I put the first leg on. It was pretty awesome. I had originally planned on feeding a bolt out through the frame holes, through the shoulder hub, and into the leg sockets, but that proved to be a royal pain in the butt getting everything lined up properly. So instead, I snagged some threaded rods and put them in the legs first. Then I dropped the shoulder hubs down onto the rods, put them through into the frame, and fastened them with nuts and lock washers, thus:


Due to the 4-6 difference, I had to do some extra drilling and only had 4 holes in. But if 4 is good enough for the aluminum legs, it oughta be good enough for the wooden ones.

Anyway, while I had the dome ring off (I had taken it off to put the skin mount points on before the legs went on), I finished off the utility arms. It seems I hadn't noticed it but the frame kit came with the proper mounting hardware for the arms, so I went ahead and put 'em on while I was at it. So at the end of tonight, R2 was looking like this:


(also pictured, my faithful assistant Uzume)

So anyway, the next step is the center ankle. It turns out I had the hardware for an aluminum center ankle, but there's a different one for the wooden version. Which I didn't know. But the frame guy is swapping me this week, so hopefully I'll have the proper hardware in my hands soon, and I can put on the center ankle, followed by the wheels and foot drives, and R2 will be standing on his own 3 feet. Can't wait.

Tuesday, March 31, 2015

leg prep

So I asked around about attaching the booster covers to the legs, and the consensus seems to point toward E6000, a craft adhesive I hadn't heard of before but folks seem to like. So I got some at Lowe's and have tested it out on the holoprojector which got knocked out of place when I was putting R2 in the car after Planet ComiCon. It says to give 24 hours to cure, so I gotta keep my cotton pickin' mitts off until tomorrow night. Hopefully this stuff will do the trick.

Meantime, I put another dose of metal paint on the wooden hubs. They're looking better, but I think I'll give them one more coat tomorrow morning before work. Also, I want to take the ankle shims with me so I can cut the back parts off and actually mount them in place. I'll see how the E6000 stuff works there, metal to wood. That's probably all I'll be able to do before I take off for the weekend. Hopefully next week I'll be able to cover some more ground on the legs, at least get the outer ones finished up and ready to go.

Monday, March 30, 2015

Legs and drives: getting closer

Well, I've been working to get the legs together. And they're coming together pretty decent, all things considered. Still trying to decide how I want to attach some of the various bits.  I did manage to get some work on them done, however:

First I painted the outer legs...


...and then the middle one.
 

 Just for fun, I laid out all the stuff on one of the legs:


Eee, can't wait.

Anyway, tonight I got some bolts from the hardware store, and one of the wooden hubs that I sawed in half to make two proper sized ones. In any case, I was able to drill some holes using the hub as a guide and was able to bolt in one of the legs as a proof of concept. Very cool.


 Meanwhile, my drives and things came. The DDRII drives came from the same guys who do the temp wheels and mounting kits for Midwest R2, so they combined shipments for me. I got two full motorized drives, two mounting blocks to attach to the drives until I get my shells (the white things on the right), a stand-in center foot (the white thing in the top right-hand corner), and a wheel system for when I get the foot shell (top left). Lots of good stuff in here, solid as a rock too. Very glad I went with these guys.


Sunday, March 29, 2015

More leg prep

So this week I got the aluminum parts to attach to the frame, including the hubs... and ran into a bit of a snag. It seems the frame and alum hubs are assuming 4 holes, like a square, whereas the legs themselves have six holes. What's more, the legs use 5/16" bolts and the frame 1/2". So it's kind of a bummer. I picked up some spacers and such, and I can do two of the bolts through the existing holes, but I think I might drill additional holes into the frame to accommodate.

Meantime, I've got ot finish 'dressing' the legs. I need to attach the panels, details, etc. I was thinking of using screws to fasten the booster covers in, or possibly keyhole slots. I'll try the latter first, hold the former as a reserve. Then I gotta fasten down the shoulders and glue in the details there. And I gotta do it before too much longer, because the drives and stuff are showing up on Monday!

No way I'm gonna get it done this week, what with my trip and all, but hopefully I can get the legs dressed and prepped for installation by mid-month. And then get the wheels and drives onto the frame proper and get that sucker rolling around. It's a tall order, but it's like the last real big thing before the skins and such.

Sunday, March 22, 2015

Today is a leg day

More specifically, this weekend has been mostly me sanding down the legs and shoulder horseshoes, and then painting them. I finished up my first can of white gloss, and am looking to polish off another. Fortunately, the weather was nice enough that I could put them outside to paint. Multiple coats all around, of course. I have to say it looks pretty good, all things considered. Should have pictures tomorrow of the results.

The plan is this week to go to the shop and do a little drilling to secure the leg details to the leg proper, get everything fastened down. That should look nice. And then I can wait for the motors and wheels to show up. Can't wait.

Wednesday, March 18, 2015

3 down, 9 to go

So, a quick update: Planet ComiCon went rather well, though I do feel that I have a hell of a long way to go compared to everyone else's stuff. It was so much fun being there, answering questions, explaining how everything worked.

Anyway, looks like the next one is going to be the Maker Faire in June or July, I forget which. I've been thinking about then, and trying to decide what I want to have ready by then. Now, there's no sign of a skin run on the horizon, but I do have the legs more or less, and so I have decided to see if I can have R2 up and rolling around by then. Toward that end, I picked up a Sabertooth 2x32 driver for the motors, slipped in to the latest DDR2 foot driver run after there was a cancellation, and have begun soliciting info from other builders on how to put it all together.

I think probably the Sabertooth will not be going on the motherboard, if only because of the sheer size. Also, there is a heatsink on it, so I will probably mount it to the frame, let the heat dissipate. Still on the fence on 12v vs 24v. When the drives and things arrive, I'll have about 67 pounds of robot tooling around, so 12 should in theory do it, but I suppose in any case we'll see. The system I'm getting is easily adaptable either way.

In the meantime, I'm working on the legs. Got the horseshoes sanded down the other day and have begun to paint. I've got some nice white gloss which should do the trick. Then this weekend I'll see about sanding and painting the legs, possibly even starting to work on attaching the bits together. Come to think of it, need to print up some more ankle cylinders. Get a full set. Hopefully, the drives and things will ship out next week (I got some mounting hardware and a center foot mount as well so they can roll around until I get a foot shell) and I should be rolling along in the not too distant future.

Sunday, February 15, 2015

COM8 Frame and more

Friday was a good day for me. My COM8 frame showed up, as did the dome gear for the motorized rotation, and the first part of my PADAWAN automation system (a PS2 extension cable).

COM8's frames tend to come in "pizza boxes". They flat pack down but have a LOT of stuff in them:


Fortunately, they do include the instructions:


First, the top ring gets the two side panels where the legs go:


Then the middle ring gets attached to the bottom of those side panels.


Up at the top, this support bar gets mounted across the middle:


Note the circle cut out here in the middle: this is for a slip ring, which if you don't know is a mechanism that legs you hook wires to an object that spins. The slip ring rotates while keeping the connection and not letting your wires get all wound up in the process.


One slight flaw: it appears one of the holes wasn't drilled quite deep enough. I'll have to get a shorter screw.


Next up is the front assembly, with the three "shelves". The top is for the large data port, the other two are where the utility arms go.


Finally, the bottom disc is added, with 8 pipes to support it (also note the two long support bars in the back):


(The thing in the lower left-hand corner, btw, is the middle leg plate. That gets added when it's leg time.)

Anyway, off to the store to pick up some smaller screws for that one hole. While I was there, however, I came across these:


3/4 inch vinyl pads, just the right size for the dome buttons.

Anyway, while the paitn was drying on those, I broke out the dome gear and the rockler bearing and started to work on them. Turns out I hadn't drilled all the mounting holes in the outer ring yet, so I had to do that. And of course after that I had to disassemble and clean the rockler all over again.

Lesson learned:
  • Drill ALL the holes in the rockler bearing, AND tap the holes for the outer ring, BEFORE you replace the bearings.
 Okay. So once that was all done, I put the rockler together, then I bolted the dome gear to it. After that I took the whole thing and bolted it down to the frame where it fit like a glove:


Next stage was to drop the dome ring over the bolts (I used 2" ones to get enough clearance, and 3 nuts for enough space that the ring could spin without disturbing the main body):


After that, it was just a question of mounting the dome to the bolts and using a couple of wingnuts to keep it in place.

After that, I broke out the bondo and started working on the legs. They and the horseshoes were very uneven, so I went ahead and gave them both heavy work on the edges:


I'll sand them down later, but for now I'm just letting them cure up nicely. Besides, all things considered, I think I've done enough this weekend:


(And that's fighting a cold!)

Monday, February 9, 2015

Today is a leg day

So the used legs I got from the junkyard showed up. I was pretty excited, as you can probably imagine. I got the wooden leg assemblies, the horsehshoes for the top, resin booster covers and booster pistons. They even had the "fat ankles" attached. So this will save me some time -- not to mention money.

That being said, I was later informed that bailing out of the leg run I had previously signed up for in favor of picking up these instead is frowned upon in the R2 club. It goes against the whole build-your-own ethos, but also it's best not to bail on a build run unless it's like financial hardship or something like that. So, now I know:

Lesson Learned:
  • Don't bail out of a product run unless you have to
 Still, I've got the legs now, and they're all right. They've been glued together, and some smoothing has been done, but it's going to take a lot more. Still, this is entirely workable, and I can't wait to make it happen.

Here is one of the legs with the booster stuff, horseshoe, and the shoulder buttons and hydraulic I printed and painted a while back:


As you can see, the booster covers are going to need some serious trimming and painting and whatnot. I'll take them by the shop soon.