But first, I gotta do a little prep.
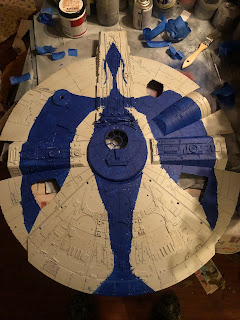
I mentioned before that I'm wanting to do a custom job. Well, I've had the idea in mind for quite some little while. Being ex-Air Force, I wanted to do something as a kind of tribute to the Thunderbirds, our formation flying team. So when it came tiem to do final prep on the top, I knew it was time to go ahead & make it happen.
First, I got a printout of a top view of the Falcon, and used that to sketch out my idea. I wound up not following it exactly, but close enough:
Next, I did some preliminary taping around the hull (after giving everything a nice clean coat of Insignia White, of course) and got the shape roughed out.
Seeing as this was too delicate for a spray job, I color-matched a small pot of paint, secured a couple different sized brushes, and got to work.
After removing the tape, I had my rough shape, ready to expand on:
I refined the head, connected it to the rest, and added the tail...
...and that's when I noticed the wings were asymmetrical. Cuss.
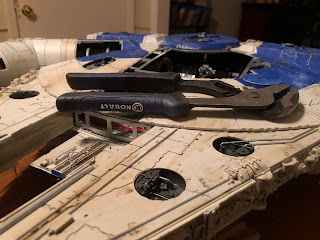
OK, back to the Insignia White. First, a little careful masking...
A few quick blasts, several light coats to cover up the trouble spots:
Hey presto. Much better.
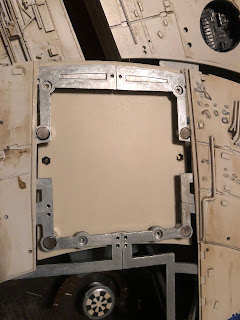
OK, now to the issue proper. First up, we're adding the 3 inset areas to the body. Note that two of them require you to remove a couple of screws from the frame first. Go ahead & do so...
They should fit in just fine, like so:
Great. Now it's cockpit time.
A bit of complaint: a lot of people groused over the cockpit originally supplied. DeAgostini promised a new version around issue 40 and even refers to it in this issue. I did not get a new cockpit in Issue 40. But the windows I got do not fit. I suspect I got the old cockpit and the new windows, or something similar. Let me finish this entry and I'll go raise Cain over at their forums.
Meantime, this is your last chance to paint these guys before they go on, so give 'em a good dose so they match up nicely:
Okay. Now assemble the cockpit just like before...
This time, attach the extension cable to the cockpit lights.
Assemble the whole schmeer as shown.
Next, take this part off the top (it's the part with the pop-off magnetic panel):
Get this part lined up with the cockpit assembly, using the two holes underneath:
Screw everything together using the aforesaid two holes.
Bolt the sucker back onto the ship.
HINDSIGHT ALERT: You can attach the cable bit here, but I found it made for too tight a squeeze. Test it first to see how it gets to the mainboard.
Now for the top turret. Take the ladder piece, and glue it so the hooks go in to the two little holes. You'll need some good glue and patience, maybe just hold it several minutes until it's good on its own.
Put it in place, with or without the window. I friction-fit it myself, because I wanted to be able to go back and remove the window if I wanted to. HINDSIGHT ALERT: I should have at least taped it down, as it wound up rotating a little. Not a dealbreaker, but still argh-y.
Now it's time to attach the bits. Now, let me save you some trouble. Check the battery box holder. Does it look like this? If so, then I misled you and that's my bad.
Should look like this, you see. Actually, go ahead and remove it for now anyway. It will make the next bit easier.
VERY carefully ease the top onto the bottom, get everything lined up. First order of business, get the pegs inside the top lined up with the holes on the mandibles. Go slow and easy. I got them set up, and then the weight would pop them out, so I had to weigh them down while I did the rest.
Start at the rear and fasten the op to the side frames using the same countersunk screws as on the bottom. The magazine says to loosen the bottom screws, but I did not find this to be needed.
Work your way forward.
When you've done that, start aft on the other side and work your way forward again.
Lastly, do the frame between the two mandibles. This is going to take some finesse, but is entirely doable. Make double sure the mandibles are in the correct place and locked into position before you do this.
Now, let's wrap up the wiring. Feed the on/off switch out through the hole shown.
If you can't quite see which one it is, it's the side panel just aft of the gangplank.
Now, plug the top turret into the mainboard right next to the connection for the bottom one.
Next goes the cockpit lights in the last available space (bit of a stretch here, as I mentioned):
Unplug the power connector from the mainboard, and connect it to the battery box. Secure the box inside its holder, thus:
Switch the battery box on, then thread the wire down and along the port side of the ship; this allows you to sneak your hand into the port airlock and ease it along (see second picture):
Plug it into the mainboard. Use the power switch to make sure we're getting juice to the board:
Hit the B button. You should get all the lights you had before, plus the turrets and cockpit lights.
(Forgot to do the landing lights)
Once you're satisfied the lights are good, go ahead and secure the battery holder to the frame again.
And that's it. A lot got done here, so pat yourself on the back.
Just for fun, here's a shot of the cockpit attached to the rest of the ship. You can really see where the weathering stops, can't you?
Anyway, looks like side body details are coming up next, so see you next time!


No comments:
Post a Comment